
To give your vintage chair new life through DIY reupholstery, start by choosing a durable fabric that matches your style and room decor. Gather essential tools like a staple gun, scissors, and a foam cutter. Carefully remove the old fabric and inspect the padding—replace it if needed. Attach the new fabric tightly, smoothing out wrinkles and securing with staples. Finish with neat corners and decorative touches. If you keep going, you’ll discover detailed steps to achieve a professional look.
Key Takeaways
- Choose durable, suitable fabric considering the chair’s purpose, decor, and maintenance needs for a long-lasting, attractive finish.
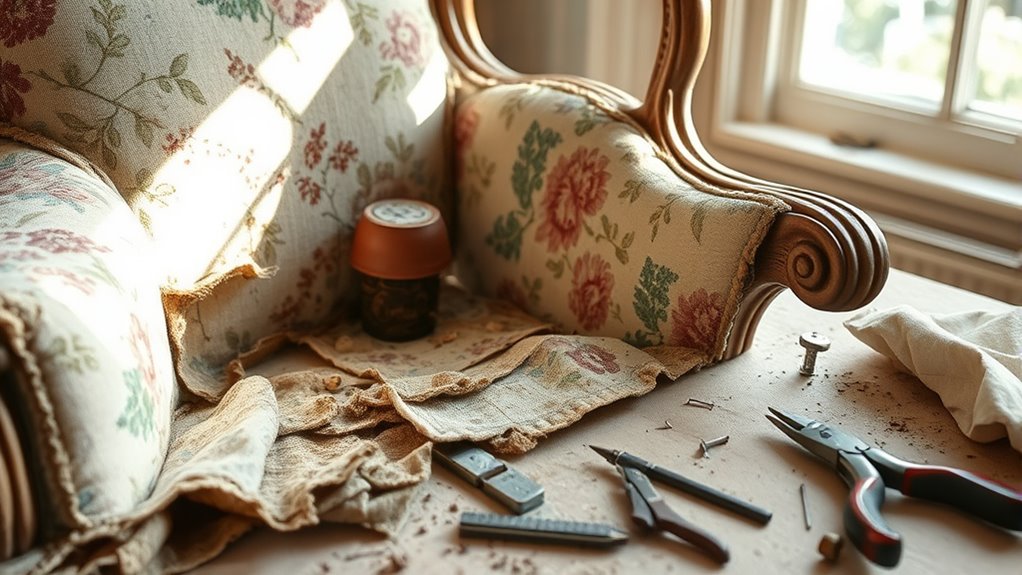
- Carefully remove old fabric and padding, noting attachment methods for easier reupholstery.
- Inspect and replace worn or flattened foam with new cushioning for improved comfort and appearance.
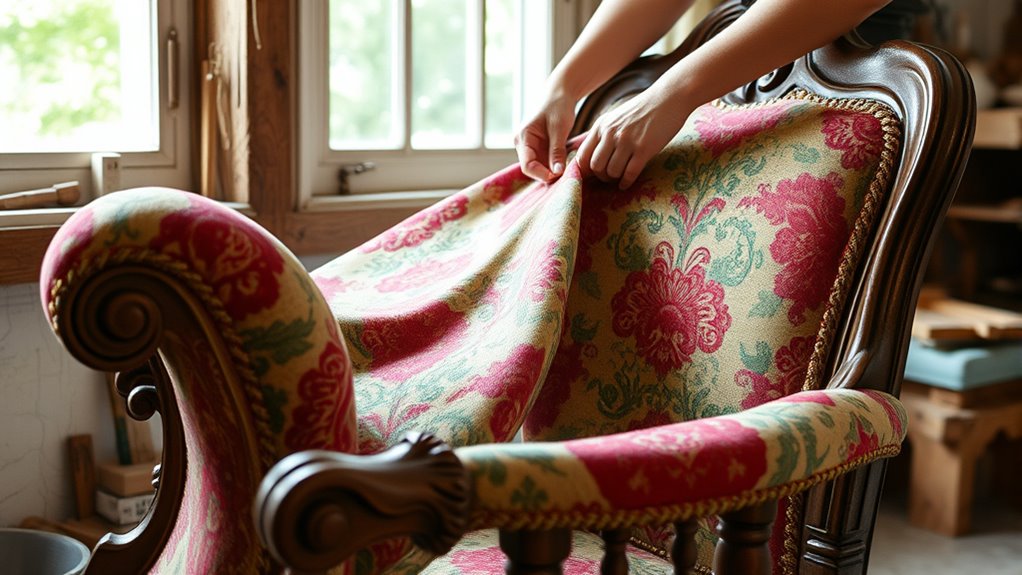
- Attach new fabric tautly using a staple gun, working from the center outward and neatly folding corners.
- Add finishing touches like decorative tacks or piping, and double-check fabric tension for a polished look.
Ever wondered if you can breathe new life into an old piece of furniture yourself? Reupholstering a vintage chair is a rewarding project that transforms a tired, worn piece into a beautiful accent for your home. The first step is choosing the right fabric, which is vital for both the look and durability of your project. Consider fabric selection carefully; think about the chair’s purpose, the room’s decor, and how much wear and tear it will endure. For high-traffic areas, opt for sturdy, tightly woven fabrics like canvas or upholstery-grade polyester. If you want a soft, luxurious feel, velvet or linen might be better, but keep in mind they may require more maintenance. Once you’ve picked the perfect fabric, gather your upholstery tools—things like a staple gun, scissors, a screwdriver, upholstery tacks, and a foam cutter. Having the right tools makes the job smoother and helps guarantee a professional finish.
Start by removing the old fabric and padding carefully. Use a screwdriver to take off any staples or tacks, and peel away the worn fabric, taking note of how it was attached. This step helps you understand the structure of the chair and serves as a template for your new fabric. Then, inspect the cushioning. If it’s flattened or damaged, replace it with new foam cut to size using a foam cutter or scissors. Proper padding makes all the difference in comfort and appearance. When you’re ready to attach your new fabric, lay it flat and smooth, ensuring there are no wrinkles or puckers. Use your upholstery tools—especially the staple gun—to secure the fabric tightly to the frame. Start from the center of each side and work your way outward, pulling the fabric taut as you staple. This process prevents sagging and creates a sleek look.
Pay attention to corners and edges, folding the fabric neatly and tucking it in for a polished finish. For a more decorative touch, you can add upholstery tacks along the edges or create decorative piping if you have the skills. Throughout the process, double-check that the fabric is smooth and evenly tensioned. When you’re finished, trim away any excess fabric and reattach any parts you removed earlier, like the legs or armrests. With patience and the right tools, you’ll find that reupholstering your vintage chair is not only doable but incredibly satisfying. The result will be a one-of-a-kind piece that reflects your style and gives new life to a beloved antique. Additionally, understanding the importance of color accuracy in your fabric choices can enhance the overall aesthetic and longevity of your reupholstered piece.

Upholstery Staple Gun Heavy Duty, YEAHOME 4-in-1 Stapler Gun with 4000 Staples, Manual Brad Nailer Power Adjustment Stapler Gun for Wood, Crafts, Carpentry, Decoration DIY
Versatile Fastening Tool – YEAHOME 4-in-1 Staple Gun accepts D-shaped, U-shaped, T-shaped, and Pin Staples. This kit comes…
As an affiliate, we earn on qualifying purchases.
As an affiliate, we earn on qualifying purchases.
Frequently Asked Questions
What Are the Best Tools for Beginner Reupholstery Projects?
To start your reupholstery project, you’ll need a screwdriver set to remove screws and a staple remover to take out old staples easily. These tools are essential for beginners, making disassembly straightforward. A good pair of scissors and a measuring tape also help guarantee precise cutting and fitting. With these basics, you’ll be well-equipped to give your vintage chair a fresh, new look with confidence and ease.
How Do I Choose Durable Fabric for Reupholstering?
When choosing fabric for reupholstering, prioritize fabric selection by considering durability testing. Look for tightly woven fabrics like linen, upholstery-grade polyester, or heavy-duty cotton, which stand up to wear. Feel the fabric’s weight and texture, and check its rub count for durability. This guarantees your project will last longer. Always opt for fabrics designed specifically for upholstery, as they’re tested for strength and resilience.
Can I Reupholster Furniture Without Previous Experience?
You can definitely try upholstery DIY even if you’re a beginner. It might seem intimidating at first, but with some beginner tips, you’ll find it manageable. Start small, gather the right tools, and watch tutorials to build confidence. Remember, patience is key, and every mistake is a learning experience. With determination, you’ll breathe new life into your furniture—no prior experience necessary. Jump in and enjoy the transformation!
How Long Does a Typical Reupholstery Project Take?
A typical reupholstery project usually takes between 1 to 3 days, depending on your project’s complexity. You’ll want to plan your project timeline carefully, including preparation steps like removing old fabric, inspecting the frame, and gathering supplies. If you’re new to this, expect some extra time for learning and troubleshooting. By staying organized and patient, you’ll successfully give your vintage chair a fresh, new look in no time.
What Are Common Mistakes to Avoid During Reupholstery?
Remember, “measure twice, cut once.” When reupholstering, avoid fabric pitfalls like choosing the wrong type or pattern that won’t hold up. Use tool tips to stay organized and gentle with delicate materials. Don’t rush; take your time aligning fabric and attaching staples. These mistakes can lead to uneven seams or torn fabric, so double-check your work and trust your tools, ensuring a professional finish.

Acu-Cutter 350 Foam Saw w/ 8" Blade
Volts: 120 AC, Amps: 4.5
As an affiliate, we earn on qualifying purchases.
As an affiliate, we earn on qualifying purchases.
Conclusion
Reupholstering your vintage chair not only saves money but also keeps a piece of history alive. With a bit of effort, you can transform old furniture into a stunning centerpiece. Did you know that furniture restoration can extend a piece’s life by up to 20 years? So, grab your tools and give that chair a fresh new look — your home and your wallet will thank you for it!

Linen Fabric by The Yard – Upholstery Fabric by The Yards Floral Pattern Sewing Quilting Cloth 60 Inch Width for Chairs Sofas Tablecloth Curtains Reupholstery DIY Projects – 1 Yard
Linen fabrics is made of high quality linen. Fabric is pre-cut into individual 1-yard pieces. Please note: ordering…
As an affiliate, we earn on qualifying purchases.
As an affiliate, we earn on qualifying purchases.

Antique Upholstery Tacks,120PCS,Furniture Tacks Nails,7/16 Inch Upholstery Nails for Sofa, Chair, Bed and Other Furniture (Antique Brass)
PACKAGE CONTENT -the package comes with 120 pieces of furniture tacks nails , which are enough for your…
As an affiliate, we earn on qualifying purchases.
As an affiliate, we earn on qualifying purchases.