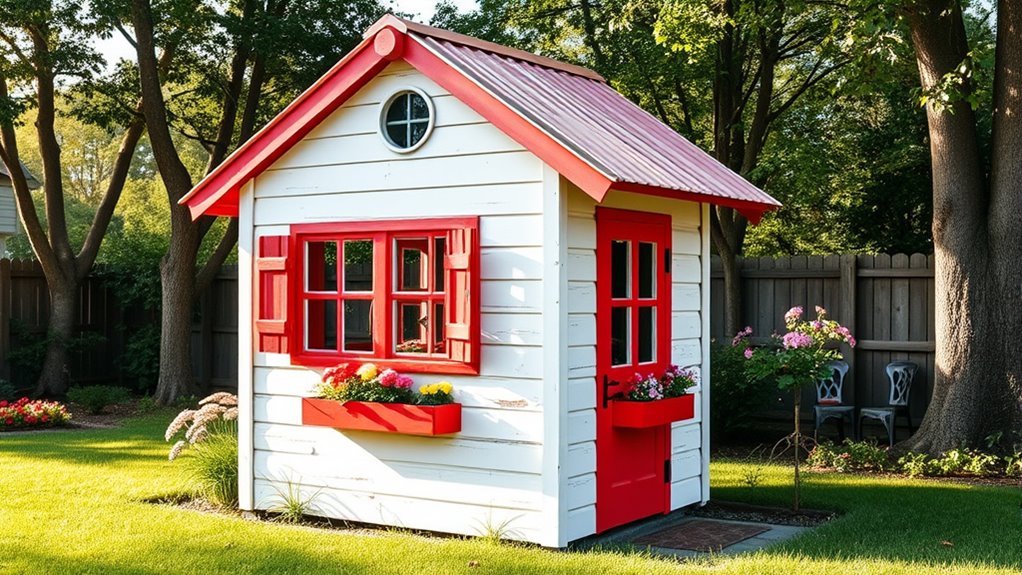
To build a retro kids’ playhouse, start by selecting bright, cheerful colors and vintage-inspired patterns like stripes or polka dots, applying safe, non-toxic outdoor paint with smooth, durable finishes. Prepare surfaces properly by sanding and cleaning, then use painter’s tape for crisp lines. Guarantee good ventilation and keep kids away during painting and drying. Afterward, maintain your playhouse with regular touch-ups. Continue exploring these tips to create a nostalgic backyard haven for your little ones.
Key Takeaways
- Use vintage-inspired paint techniques like stenciling, polka dots, or faux wood grain with bright colors for nostalgic charm.
- Ensure surface preparation, including cleaning and sanding, for a smooth, durable, and professional finish.
- Select non-toxic, outdoor-safe paints and wear protective gear to keep children safe during and after painting.
- Work in well-ventilated areas, keep children away during painting, and allow surfaces to fully dry before play.
- Regularly inspect and touch up painted surfaces to maintain safety, appearance, and the playful vintage aesthetic.
Building a retro kids’ playhouse is a fun and rewarding project that sparks creativity and provides a special space for your children to enjoy. When you decide to add a splash of personality and charm, DIY paint techniques are a great way to bring your vision to life. You can use stenciling, sponging, or even hand-painting designs to create a vintage look that’s full of character. Before you start painting, make sure you select kid-safe, non-toxic paints that are durable enough to withstand outdoor weather. Using the right paint not only ensures safety but also prolongs the lifespan of your playhouse’s finish.
As you work on your playhouse, safety considerations should be at the forefront. When handling paint, always work in a well-ventilated area and wear protective gear like gloves and masks to avoid inhaling fumes. If you’re painting outdoors, choose a day with mild weather to prevent paint from drying too quickly or running. Keep young children away from the area during painting and drying to prevent accidental ingestion of paint or contact with harsh chemicals. Additionally, make sure all surfaces are smooth and free of splinters before you begin painting to guarantee your kids won’t get hurt while playing.
When applying DIY paint techniques, prepare your surfaces properly. Sand down any rough edges or peeling paint, and clean the surface thoroughly to remove dust and debris. Use painter’s tape to create clean lines and protect areas you don’t want to paint. For a retro look, consider using bright, cheerful colors combined with vintage-inspired patterns. You might add stripes, polka dots, or even a faux wood grain to mimic classic playhouse styles from the past. Remember to use multiple thin coats of paint rather than one thick coat, as this results in a smoother finish and less chance of drips. Proper surface preparation is essential for achieving a professional-looking finish and ensuring the longevity of your paint job.
Throughout the painting process, keep safety considerations in mind. Store all paints and brushes out of children’s reach, and clean up thoroughly once finished. Ensure that any painted surfaces are fully dry and cured before allowing your kids inside. This not only prevents them from smearing wet paint but also ensures that the paint is fully safe to touch. By combining creative DIY paint techniques with strict safety practices, you’ll create a charming, nostalgic playhouse that your kids will love for years to come. It’s a project that’s as fun to build as it is to see your children enjoy.
Frequently Asked Questions
What Safety Features Are Essential for a Retro Kids’ Playhouse?
You should prioritize safety features like soft playground surfacing to cushion falls and prevent injuries. Make certain the playhouse has lockable doors to keep kids secure and prevent accidental escapes. Additionally, check for smooth edges and sturdy construction to avoid splinters or breakage. Regularly inspect all components to maintain safety standards. These measures help create a secure, fun environment where your little ones can enjoy their nostalgic backyard playhouse safely.
How Much Does a DIY Retro Playhouse Typically Cost?
A DIY retro kids’ playhouse usually costs between $200 and $600, depending on materials and size. To stay within your playhouse budget, use cost-saving tips like repurposing recycled wood, shopping sales, and choosing simple designs. You can also DIY paint and decorations to add a personalized touch without overspending. Planning ahead helps you keep the project affordable while creating a charming, nostalgic play space for your little ones.
Are There Eco-Friendly Materials Suitable for Outdoor Playhouses?
You can definitely find eco-friendly materials for outdoor playhouses, giving you a leg up in the green game. Think sustainable wood, which is responsibly sourced and durable, or recycled plastics that stand the test of time. These materials keep your backyard eco-conscious while creating a safe play space. You’ll be able to build a charming playhouse that’s as kind to the planet as it is fun for the kids—a win-win situation.
Can a Retro Playhouse Be Easily Adapted for Different Age Groups?
Yes, a retro playhouse can be easily adapted for different age groups by incorporating adjustable features and versatile designs. You can add removable or adjustable seating, height-adjustable counters, and modular elements that grow with your kids. These features make the playhouse more inclusive and fun for all ages, ensuring it remains engaging as your children develop their interests and skills over time.
What Maintenance Is Required to Keep the Playhouse in Good Condition?
You’ll want to stay on top of playhouse cleaning to keep it inviting and safe. Weatherproofing tips, like sealing wood and checking for leaks, help it withstand the elements and prolong its charm. Regular inspections for splinters or loose nails prevent accidents, and a fresh coat of paint keeps it looking nostalgic. With a little effort, your retro playhouse remains a delightful, durable haven for years to come.
Conclusion
Building this retro kids’ playhouse isn’t just a project — it’s like creating a tiny kingdom of endless joy and adventure right in your backyard. Your little ones will cherish it more than the most precious treasure, and you’ll smile every time they laugh and play inside. So grab your tools and start building this nostalgic haven; it’s guaranteed to turn your backyard into the most magical place on earth — a true childhood wonderland!